Stripe
This payment is available for WooCommerce, Magento, Notion.
This guide shows you how to install the Stripe Payment, Apple Pay, and Google Pay. You also can use Apple Pay and Google Pay on Stripe too.
1. Setup Stripe Node Server
If you are using StripeServerNode-v2, update it to the latest StripeServerNode-v3.
- Contact us to download the Stripe Server NodeJS project.
- Open
index.jsin the Stripe server project folder, then:
Set your Stripe Secret key to
stripeSecretKey.Set your returnURL to
websiteUrlin index.js (for Stripe v1 only).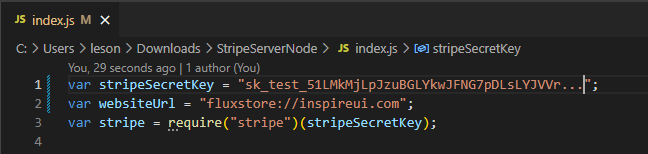
After handling 3D Secure, Stripe will redirect back to the app using `websiteUrl`.


`websiteUrl` should be in this format: _<yourappname>://<yourwebsite.domain>_


(Example: _fluxstore://inspireui.com_).


:::tip

**IMPORTANT: This requires App Links/Custom URL Schemes to be configured**. Please scroll down to the bottom to see the guide for configuring App Links/Custom URL Schemes.

:::
Upload your server project to a new PRIVATE GitHub/GitLab repository.
Deploy your server using Vercel. Follow their guide to setup Vercel for GitHub or Vercel for GitLab
From Vercel, copy the URL of the server domain:
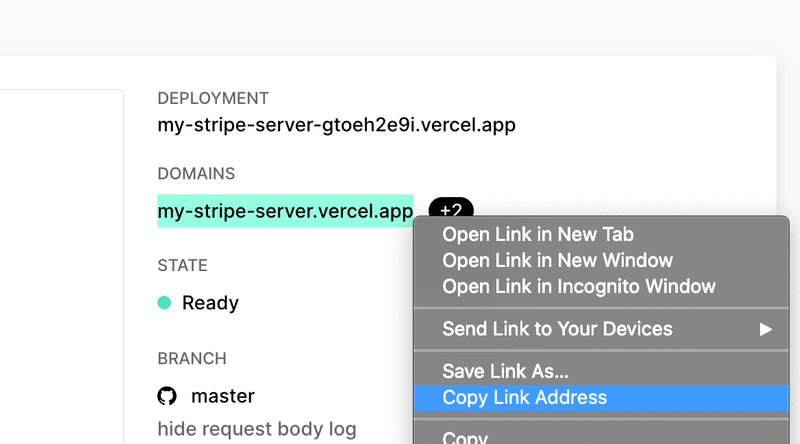
On the app builder, open your app. Then select Features > Payment Methods > Stripe Payment. Replace
https://your-stripe-server.vercel.appwith the copied URL:
Test:
- Test API keys (publishable key & secret key) can be taken here.
- You can use a card number
4242 4242 4242 4242with any CVV & any future expiry date to test Stripe payment (only works with test keys). - To test 3D Secure, you can use this card
4000 0027 6000 3184or get more at Stripe's documentation.
2. Configure Apple Pay
Follow steps below:
- Take a look at the integration requirements.
- Create a merchant identifier for your business.
- Create a payment processing certificate to encrypt payment information.
Then upload the created payment processing certificate to your Stripe account.
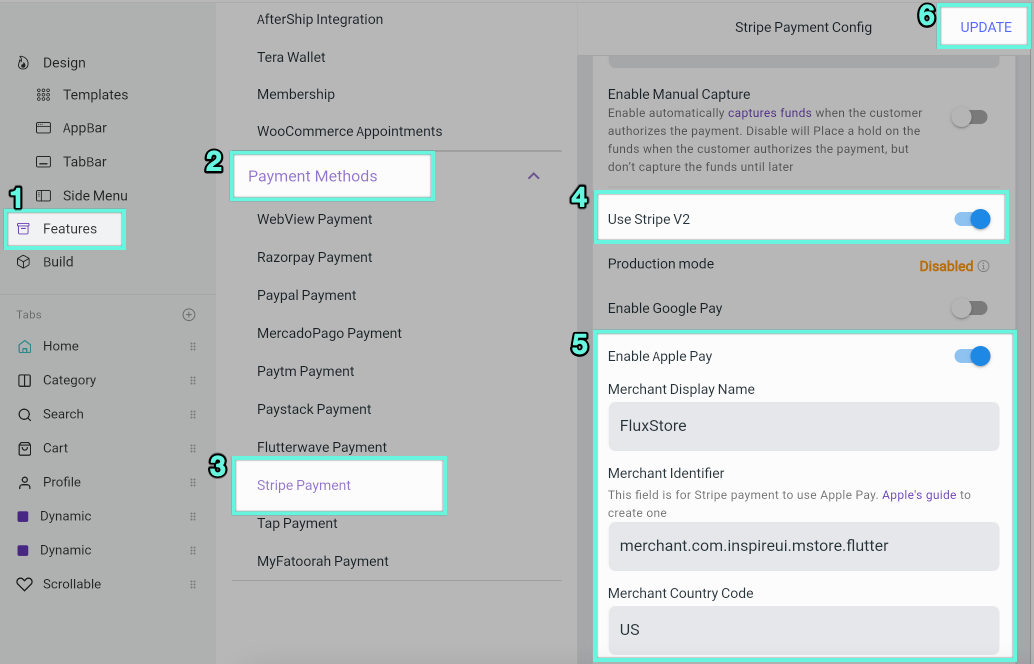
- On the app builder, open your app.
Then select Features > Payment Methods > Stripe Payment > enable Stripe > enable Use Stripe V2 > enable Apple Pay.
And input Merchant Display Name, Merchant Identifier, Merchant Country Code:
- Release to TestFlight before testing with live keys. To test with test keys, use an iOS simulator.
3. Configure Google Pay
Follow steps below:
Take a look at the integration requirements.
Sign in to the business console and create a business.
Fill in all business information and Request production access to the Google Pay API for your app. You can wait a few days for the validation.
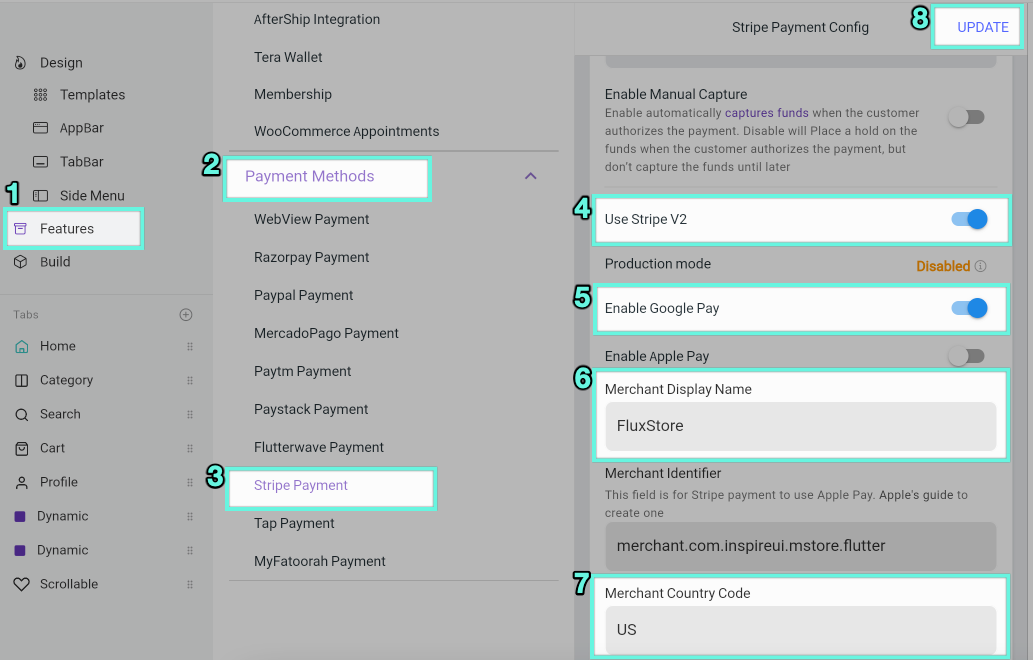
On the app builder, open your app.
Then select Features > Payment Methods > Stripe Payment > enable Stripe > enable Use Stripe V2 > enable Google Pay.
And input **Merchant Display Name** and **Merchant Country Code**:
- Upload your app to Google Play Console (Internal testing/Closed testing track) and download it from Play Store to test.
4. Common Issues
💊 Intent error: No such payment_intent
Please check Server Endpoint URL and Publishable key in your Stripe account.
💊 OR_BIBED_07 error with Google pay on Android release mode
Please double-check step 3 at Configure Google Pay section
💊 Always showing an error message with Apple pay on a real device: "Transaction failed. Please check the card information and try again."
Please check your device has a card in your Apple wallet and make sure you have uploaded the created payment processing certificate to your Stripe account.
💊 Your order does not update status after successful payment
Please check the webhooks or create a ticket on the support site so we can give you the custom code